AWS
![]()
Streamlining File Transfer via a Bastion Host

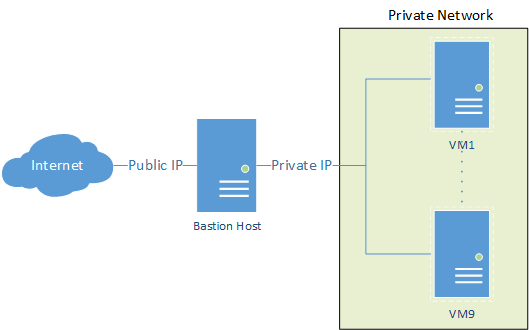
Accessing private servers through a bastion host, like AWS private cloud, and transferring local files doesn’t have to be a complex process. With a straightforward command utilising scp and the ProxyJump feature, you can seamlessly accomplish this task. Assuming your SSH keys are configured correctly on your local machine, here’s how to automate the transfer to the endpoint private server via the public-facing bastion host.
scp -J <user-name>@<Public-IPv4-DNS> \
    <file-to-transfer> \
    <user-name>@<IP-address>:/path/for/remote/file
For systems where ProxyJump isn’t available, you can opt for the ProxyCommand method instead.
scp -o 'ProxyCommand ssh <user-name>@<Public-IPv4-DNS> -W %h:%p' \
  <file-to-transfer> \
<user-name>@<IP-address>:/path/for/remote/fileIt’s worth noting that while both methods facilitate the transfer, ProxyJump is recommended over ProxyCommand as it adds an extra layer of encryption to the traffic, enhancing security during file transfers.
Update IP restriction in AWS security groups from the command line
If you are using IP restrictions to secure your AWS EC2 SSH connections and have a dynamic local IP, then you might be sick of constantly having to update your IP via the AWS console. Fortunately there is a easier pathway for this; you can update your IP restrictions using the AWS CLI from your local computer 👇
#Input parameters
group_id=<YOUR SECURITY GROUP ID>
rule_id=<THE SECURITY GROUP RULE ID YOU WANT TO EDIT>
rule_description="ssh from local"
port=22

# Get current local IP
ip=$(/sbin/ip -o -4 addr list eth0 | awk '{print $4}' | cut -d/ -f1)

# Update secruity group rule with new local IP
aws ec2 modify-security-group-rules \
    --group-id $group_id \
    --security-group-rules SecurityGroupRuleId=$rule_id,SecurityGroupRule="{Description=$rule_description,IpProtocol=tcp,FromPort=$port,ToPort=$port,CidrIpv4=${ip}/32}"
The above code first collects your current local IP address and then utilises the aws ec2 modify-security-group-rules command to update the security group and rule that you have defined in the parameter.
Take it a step further and make it an executable bash script or wrap it in code that checks for when your IP address changes and then have it as a cron job.
This assumes the AWS CLI is configured on your local machine.
Enable Mouse Scrolling in tmux
Like many others you might find yourself using tmux to maintain active terminal sessions and long-running processes on remote servers in the event of a voluntary or involuntary disconnect. One thing you will soon notice though is by default you cannot scroll the terminal with your mouse 🖱️ Instead, you need to resort to some keyboard shortcuts ninja moves 🥷
CtrlCtrl + bb then [ followed by the arrow keys ↑ + ↓ to scroll up and down. Once finished press q
If that isn’t (understandably) your cup of tea you can enable mouse scrolling.

If you don’t already have a tmux conf file in your home dir, create one
touch ~/.tmux.confand add the following line and save
set-option -g mouse onAfter this your may need to reload tmux with the conf file
tmux source-file ~/.tmux.confNow just hold those horses, you aren’t finished set yet.

One last thing to note, because you have enabled mouse scrolling, click based copy/paste doesn’t work the same as before. Instead now you need to hold down ShiftShift when selecting the relevant text to copy and hold ShiftShift when you click to paste.
Please reach out if you have any additional conf settings or suggestion on this topic.
Citation
@online{pembleton2024,
  author = {Pembleton, LW},
  title = {AWS {Ramblings,} {A} Worthy Collection of Short {AWS} \&
    Cloud Commands and Tricks},
  date = {2024-06-26},
  url = {https://lpembleton.rbind.io/ramblings/AWS/},
  langid = {en}
}