Bash

Working with Tar and Gz Files 🗜️
Although in bioinformatics we like our data, the more the merrier. System admins and our cloud computing bills often hold a different view. Consquently more often then not in bioinformatics you will encounter files that have the .gz extension. These have been compressed by the popular Gzip algorithm to save disk space.
Uncompressing and recompressing such files, is straighforwards and even viewing their contents, is akin to using the cat command:
# Uncompress a .gz file
gunzip sample01.vcf.gz

# Compress a file
gzip sample01.vcf

# View contents of a .gz file
zcat sample01.vcf.gzYou can use zcat to pipe the uncompressed contents of a .gz file into other bash commands like sed, grep, awk etc, without writing the uncompressed file to disk.
Another prevalent file type you may come across is one with a .tar.gz extension. These files are Tar archives that have undergone compression with the Gzip algorithm. Essentially, they are a collection of files or directories bundled into an archive. They find common usage in backups, software distribution, or as a convenient way to store related files.
When extracting content from compressed tar files, the tar command is your go-to:
tar -xvf archive.tar.gz-x is the extract option, -f specifies that the filename to extract will follow after, while -v is optional, it will print the names of the files being extracted from the archive to the terminal.
You can also extract just specific files from the archive, provided you know their names 🔮
tar -xf archive.tar.gz file1 file2However, if the specific file names elude you (we are only human), you can list the contents of the archive with:
tar -tf archive.tar.gzIf you get a bit of variety in your bioinformatic journey and stumble upon a .tar.bz2 file, no fear it has just been compressed with the bzip2 algorithm. Just treat it the same as the .tar.gz file, and tar will do all the hard work.
tar -xvf archive.tar.bz2Monitoring process times ⏱️
An often overlooked tool that significantly aids in optimizing processes is the ‘time’ command in Unix-based systems. This powerful tool not only executes a given command but also provides valuable information about how much time the command took to run.
To quantify the duration of a process, simply append the time command at the beginning:
time bcftools filter -O z -o filtered.vcf.gz -i '%QUAL>50' in.vcf.gzThe output of the time command will typically have three components:
Real time (real): This is the actual clock time elapsed during the execution of the command.
User CPU time (user): This represents the amount of CPU time spent in user-mode code (i.e., within the process).
System CPU time (sys): This denotes the CPU time spent in the kernel within the system calls made by the command.
In the world of bioinformatics where there is 101 ways to do the same time, it is often wise to do some benchmarking with the time command to ensure you are using the most efficient tool.
Using {tee} to log command outputs.
When working in a Bash terminal and you want to log the output of a command for future reference, the tee command is a handy tool, especially in multi step analyses. Here’s a quick tip on how to use it effectively:
Basic Usage: To log the output of a command and simultaneously view it on the terminal, use the following format:
my_command | tee my_log.txtReplace my_command with your actual command and my_log.txt with the desired log file name.
Appending to Existing Logs: To append output to an existing log file (useful for logging multiple command or runs of the same command), use the -a option with tee:
my_command | tee -a my_existing_log.txtCapture standard error aswell: By default tee captures standard out (stdout) and saves it to file whilst also printing to screen. However if you want to capture standard error (stderr) as well as stdout just add 2>&1 after your command before you pipe to tee:
my_command 2>&1 | tee my_log.txtUsing {basename} in Bash for File Name Extraction
In Bash, you can use the basename command to extract the file name from a given file path. This is particularly useful when you’re working on tasks like data processing pipelines or automation scripts and need to isolate the file’s name from its full path.
Basic Syntax:
basename [PATH]Usage Example: Suppose you have the following file path: /path/to/your/file.txt. Using the basename command as follows:
basename /path/to/your/file.txtYou will obtain just the file name file.txt as output:
If you also want to remove the trailing suffix simply add the suffix as a second argument to the end of the command:
basename file.txt .txtWhich in this example will return file
Streamlining File Transfer via a Bastion Host
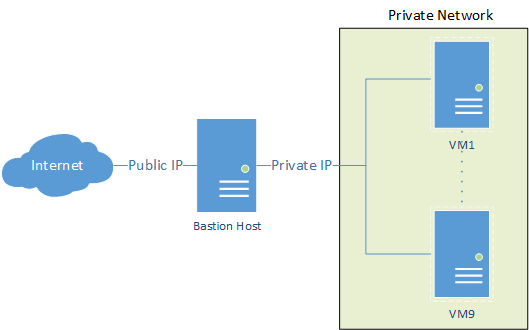
Accessing private servers through a bastion host, like AWS private cloud, and transferring local files doesn’t have to be a complex process. With a straightforward command utilising scp and the ProxyJump feature, you can seamlessly accomplish this task. Assuming your SSH keys are configured correctly on your local machine, here’s how to automate the transfer to the endpoint private server via the public-facing bastion host.
scp -J <user-name>@<Public-IPv4-DNS> \
    <file-to-transfer> \
    <user-name>@<IP-address>:/path/for/remote/file
For systems where ProxyJump isn’t available, you can opt for the ProxyCommand method instead.
scp -o 'ProxyCommand ssh <user-name>@<Public-IPv4-DNS> -W %h:%p' \
  <file-to-transfer> \
<user-name>@<IP-address>:/path/for/remote/fileIt’s worth noting that while both methods facilitate the transfer, ProxyJump is recommended over ProxyCommand as it adds an extra layer of encryption to the traffic, enhancing security during file transfers.
Extract Data Lines From a VCF File
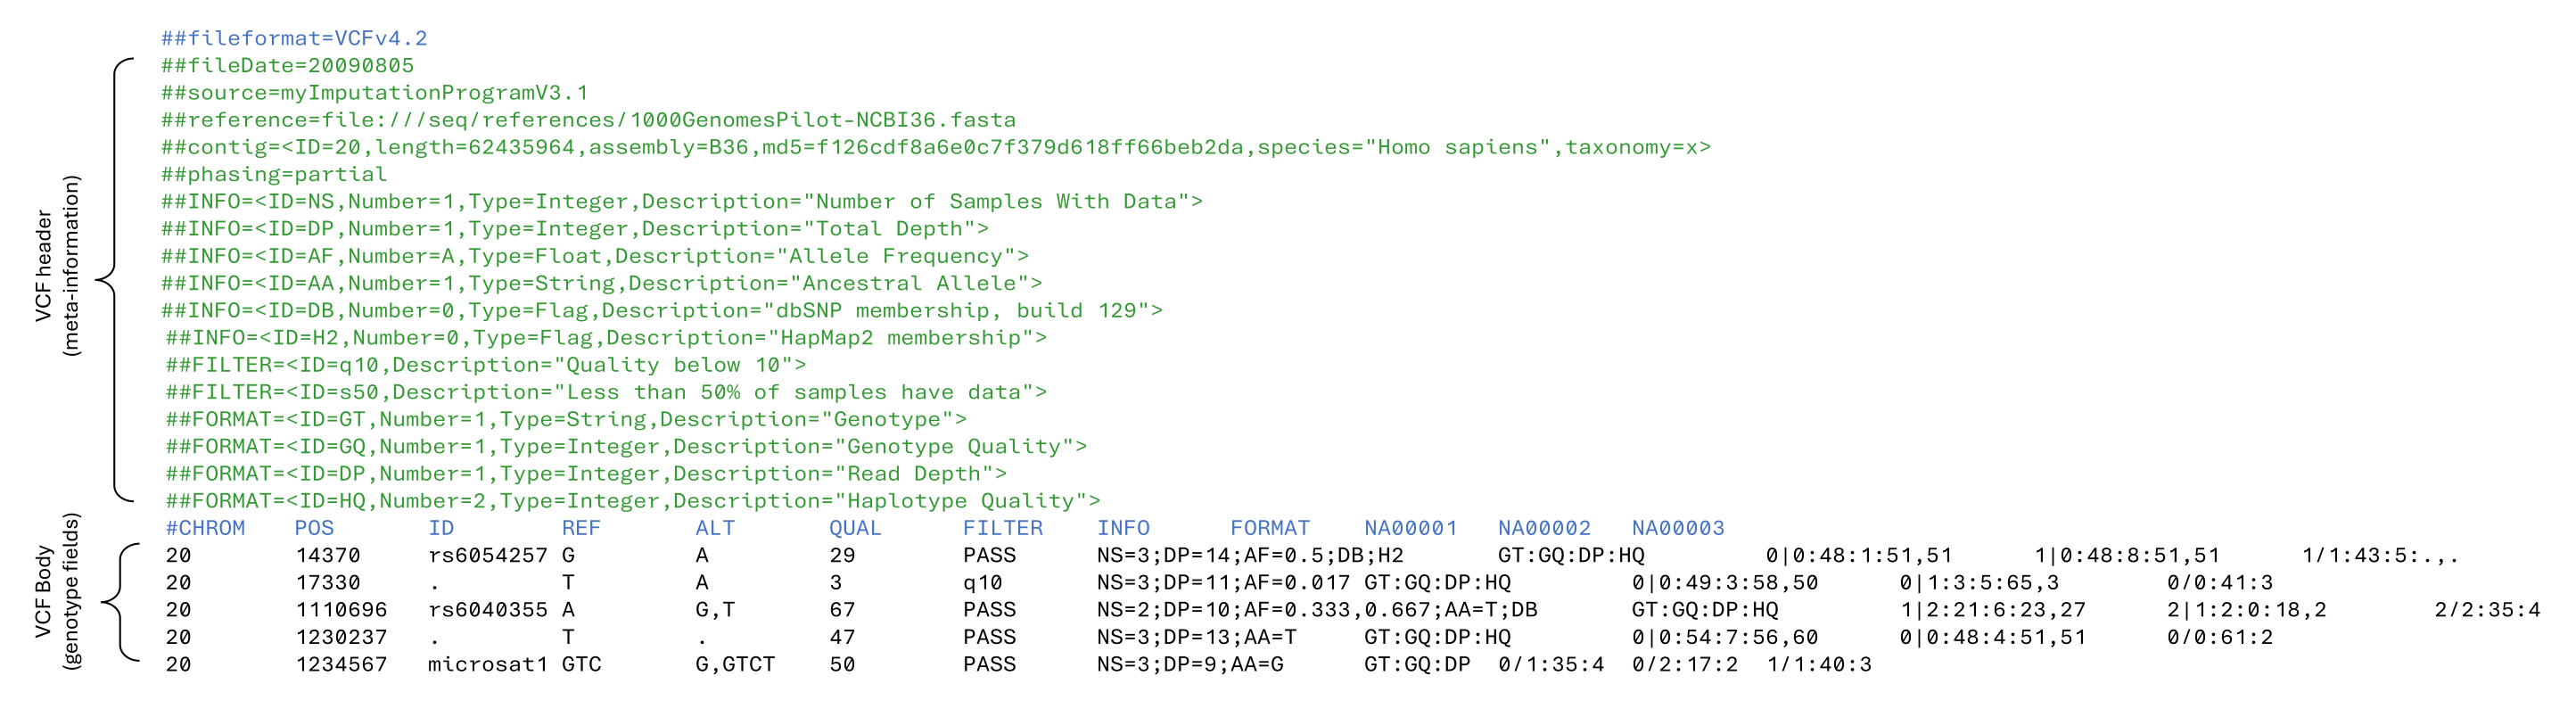
Visual inspection 🔍 of the data lines (i.e. genotype fields) of VCF file is often impeded ⛔ by the large number of meta-information lines at the top. A simple sed command that looks for the mandatory body header line can get your past this hurdle 🚧
sed -n '/#CHROM/,$p' filename.vcfIn short this command searches for the pattern ‘#CHROM’ and then starts printing to the screen until the end of the file. Pipe this into a head command (| head) and you now have a quick and simple way 🟢 to inspect the start of a VCF file.
Separate columns in file with multiple whitespaces
When dealing with tabular text files where columns are inconsistently separated by varying numbers of whitespaces, a quick solution comes through using the translate command tr and the -s squeeze repeats feature. By employing tr to convert multiple consecutive whitespaces into a single whitespace, you can seamlessly tidy 🧹 the data before applying cut for column extraction.
For instance, to isolate the 3rd and 4th columns from a file:
tr -s ' ' < file.txt | cut -d ' ' -f 2,3
#  ^^^                            ^^^^^^
#   |                                |
#   |                                |
# squeeze repeats            get 2nd & 3rd field
Human-readable file and directory sizes
Want human readable file sizes in your ls commands? Simply add - ld
# Size in bytes
ls -l

# Human readable sizes
ls -h
Same principle applies to directory sizes with the du disk usage command
# List directory sizes 1 level deep
du -hd1

# List the total size of the current directory
du -hs
Quickly search your bash history for a previous command
Say goodbye to pressing ▲▲ endlessly in bash to get back to a previously used command. Instead your can press CtrlCtrl + RR and search for any matching text in your previous command history. Keep pressing CtrlCtrl + RR to cycle through more matches.
💡 Think ahead and if there is a command you will likely need to run again, tag it with a comment # that your can then easily search for. For instance say you have a specific command you know you will want to run again later, append #cmd for later after the command. That way, you have a unique CtrlCtrl + RR search phrase for quicker retrieval.
On some systems the default bash history can be short which will limit how far your can search. To check your current bash history size run
echo $HISTSIZEIf you want to increase your history size you need to edit your ~/.bashrc and add (if not already present):
HISTSIZE=50000 # or a different numberAlso if you want to avoid some commands appearing in your history just append a whitespace for example
echo 'this will appear in my bash history'

 echo 'this will not appear in my bash history'
Make a demo set of FASTQ files containing reads that belong to a subset of chromosomes or regions
Useful when making demo datasets to test development code and pipelines.
First map all your reads to the full genome reference. Then use samtools to pull out those reads that mapped to specific regions within a bed file, for example, this could be a couple of full-length chromosomes.
samtools view -b -h -L regions.bed alignments.bam > alignments_in_regions.bamNow you will want to discard any reads that are not mapped with their respective pair.
samtools view -f 0x2 -b -h alignments_in_regions.bam > alignments_in_regions_paired.bamAnd now you convert you bam back to paired fastq files.
samtools fastq -1 read1.fastq -2 read2.fastq alignments_in_regions_paired.bamDepending on whether your bams were sorted or not you may need to sort the resulting FASTQ files to prevent any downstream errors and subsequent programs.
cat read1.fastq | paste - - - - | sort -k1,1 -t " " | tr "\t" "\n" > read1_sorted.fastq
cat read2.fastq | paste - - - - | sort -k1,1 -t " " | tr "\t" "\n" > read2_sorted.fastq